

Speed isn’t just about how fast you move—it’s about how quickly you adapt. In the world of athletic performance, Agility Training is the secret weapon that separates the good from the great. It’s not just running fast; it’s about mastering cone changes of direction, refining cutting mechanics, and executing deceleration drills with precision.
Picture this: a split-second decision, a sharp pivot, a burst of acceleration—your body responding with flawless control. That’s the magic of lateral shuffle work and reactive agility cues, where milliseconds matter, and every movement counts.
Whether you’re sprinting through shuttle runs, carving up the field with sport agility patterns, or mastering T-drill variations and zig-zag sprints, agility training transforms raw talent into explosive results. It sharpens your reflexes, strengthens your neuromuscular connections, and builds the kind of dynamic coordination that wins games and shatters personal records.
Forget predictable routines—agility training is about unpredictability, adaptability, and relentless improvement. Ready to unlock your explosive potential? Let’s dive into five game-changing tips that will revolutionize your approach to speed, control, and performance.
What Is Agility Training
Benefits Beyond Speed
Agility Training is far more than a simple sprint from point A to B. It’s a symphony of movement, precision, and split-second decision-making. At its core, agility training hones the body’s ability to shift, pivot, and accelerate with control—skills that transcend mere speed. Whether executing cone change-of-direction drills or mastering cutting mechanics, athletes develop a heightened sense of spatial awareness and body control.
Beyond velocity, agility training cultivates explosive deceleration drills that protect joints and prevent injury. Lateral-shuffle work sharpens the ability to move laterally with power, while reactive-agility cues challenge the mind to process and respond instantly. Shuttle runs and sport agility patterns replicate the unpredictable demands of real competition, forcing athletes to adapt on the fly.
T-drill variations and zig-zag sprints further refine directional changes, teaching the body to transition seamlessly between movements. This multidimensional approach not only boosts athletic performance but also enhances coordination, balance, and reaction time. Agility training is the unsung hero behind the scenes, empowering athletes to move with grace, power, and precision—whether on the field, court, or track.
How Agility Differs from Speed Training
Agility isn’t just fast movement—it’s intelligent, reactive control under pressure. Speed training is about maximizing linear velocity: how quickly you can cover ground in a straight line, whether sprinting 10, 40, or 100 yards. Agility training, on the other hand, is multi‑dimensional, blending acceleration, deceleration, and sharp directional shifts into a fluid package.
Think of speed as pure horsepower; agility is the entire chassis, steering, and brakes working in concert. A sprinter leans into pure speed, minimizing lateral movement to maximize straight‑line velocity. An athlete in a sport like soccer or basketball, meanwhile, survives on cone change‑of‑direction, cutting mechanics, and deceleration drills that let them stop, pivot, and explode again in a heartbeat.
Agility also demands far more from the nervous system: reactive agility cues, shuttle runs, and sport agility patterns force the brain to read situations and adjust movement in real time. It’s not just moving fast; it’s moving smart, with lateral shuffle work, T‑drill variations, and zig‑zag sprints training the body to change angles, absorb force, and re‑launch with precision and control.
The Science Behind Agility Development
Neuromuscular Coordination Explained
Agility isn’t just about muscle—it’s a neural symphony. At its core, the science of agility development hinges on neuromuscular coordination: the seamless dialogue between nervous system and locomotor machinery. When you explode into a sprint, plant hard on one foot, and pivot during a cone change‑of‑direction, it’s not raw power that saves the moment—it’s the brain’s ability to fire the right muscles at the right time, with split‑second precision.
This is neuromuscular coordination in action: the nervous system rapidly recruiting motor units, coordinating agonist and antagonist muscles, and synchronizing movement patterns across limbs and joints. In lateral shuffle work, the body must maintain stability while shifting mass laterally; in deceleration drills, muscles act as brakes, absorbing force eccentrically before re‑accelerating. Poor coordination leads to wasted energy, inefficient angles, and higher injury risk; refined coordination turns chaotic moments into controlled, explosive transitions.
Agility also demands a sharp perceptual layer. Reactive agility cues train the athlete to process visual, auditory, or spatial information and respond instantly—whether it’s a defender’s shoulder dip or a whistle command. This “perception‑action loop” is what separates rehearsed shuttle runs from true sport‑specific unpredictability. In open‑skill sports, sport agility patterns like T‑drill variations and zig‑zag sprints ingrain movement templates while conditioning the nervous system to handle temporal and spatial uncertainty. The result is cleaner cutting mechanics, faster transitions, and movement that feels instinctive, not forced.
Fast-Twitch Muscle Fiber Activation
Fast‑twitch fiber activation is the hidden engine of explosive agility. These Type II muscle fibers specialize in rapid, powerful contractions; they’re what drive a sudden burst out of a shuttle run, a lightning‑quick plant during lateral shuffle work, or a violent redirection in a cone change‑of‑direction drill. Unlike slow‑twitch fibers built for endurance, fast‑twitch fibers fatigue quickly but generate far more force, making them essential for the short bursts of speed, sharp cuts, and rapid deceleration that define agility training.
They’re recruited only when movement demands high intensity: explosive sprints, jumps, and rapid directional shifts found in T‑drill variations and zig‑zag sprints. To activate them, the nervous system must send a strong, fast signal; this happens during plyometrics, heavy strength work, and high‑velocity drills that push the body beyond its comfortable pace. As those fibers fire more frequently, they become more efficient, improving cutting mechanics, reducing ground contact time, and sharpening the ability to respond to reactive agility cues.
Over time, consistent deceleration drills and dynamic sport agility patterns condition fast‑twitch fibers to switch on instantly and absorb force cleanly, turning uncontrolled chaos into a fluid, powerful sequence of movement.
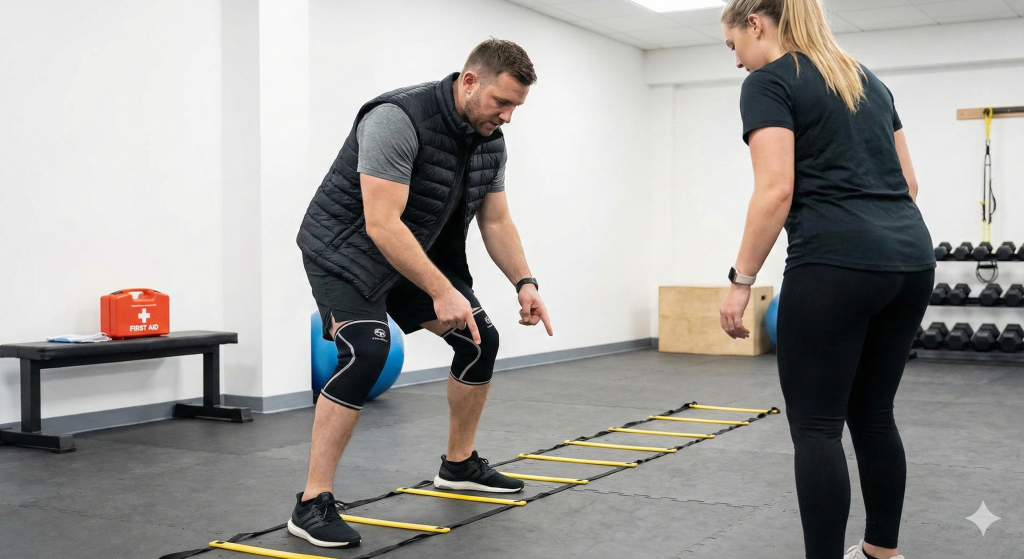
Tip 1: Master Ladder Drills for Footwork
Basic Ladder Patterns to Start
Two simple, highly effective ladder patterns for beginners are the One Foot In / One Foot Out (In-Out-In-Out) and Two In, Two Out drills. In the In-Out-In-Out pattern, step one foot into the first square, then the other, then step out with the first foot, then the other (in-in-out-out per square) as you advance down the ladder; this builds rhythm and coordination for agility training. The Two In, Two Out drill uses a hop: both feet land in the first square, then hop out so feet are outside the ladder on either side, then back in the next square, repeating the pattern.
These patterns teach the feet to move quickly and precisely, laying the foundation for faster footwork, better timing, and smoother transitions in shuttle runs, T‑drill variations, lateral shuffle work, and unpredictable sport agility patterns. Focus on staying light on the balls of the feet, keeping the torso upright, and driving the knees and arms in coordination—this neural groove is what safely progresses to sharper cone-change-of-direction, cleaner cutting mechanics, and sharper reactive-agility cues as skills advance.
Advanced Ladder Combinations
Advanced ladder combinations fuse multiple patterns into seamless, high‑output sequences that challenge rhythm, coordination, and reaction. A classic combo is the In‑In‑Out‑Out (Double In, Double Out) followed by a high‑knee run: this eats up ground while keeping feet tight and fast, ideal for sharpening shuttle runs, T‑drill variations, and zig‑zag sprints. Another powerful progression is the Icky Shuffle blended with a lateral carioca, forcing the body to cross over and rotate under speed, mimicking the chaotic cone change‑of‑direction of real‑world sport agility patterns.
For elite athletes, chain a single‑leg hop ladder into a cross‑over run, then finish with a scissor‑style hop; this builds explosive single‑leg stability, clean cutting mechanics, and rapid deceleration drills. Add a reaction layer by calling out switches mid‑ladder (e.g., “Reverse!” or “Backpedal!”) to train reactive agility cues on the fly. These advanced combos turn the agility ladder from a simple footwork tool into a dynamic nervous‑system stimulator, where every movement is precise, purposeful, and primed for explosive, game‑ready performance.
Common Ladder Drill Mistakes
Rushing through ladder drills without proper control is the most common mistake; reps become messy, heavy, and slow instead of sharp, light, and fast. Athletes often lean too far forward, driving the chest toward the ground, which kills balance and forces the center of mass ahead of the feet. This wrecked posture undermines cutting mechanics, deceleration drills, and clean lateral shuffle work on the field.
Another frequent error is trying to move too fast before mastering the pattern: stepping outside the squares, stumbling, or losing rhythm. This teaches the nervous system sloppy footwork, not the crisp, efficient strides that transfer to shuttle runs, T‑drill variations, and sport agility patterns. Related to this is the “stomping” tendency: overplanting the whole foot, especially the heel, which increases ground contact time instead of promoting quick, ball‑of‑the‑foot contacts that fuel explosive zig‑zag sprints and cone change‑of‑direction.
Finally, many treat the ladder as an isolated foot speed tool and ignore the reactive and directional components. Simply going fast in a straight line won’t build true agility training benefits; the real transfer comes when the ladder is used as a prep for cutting, decelerating, and reacting to reactive agility cues under game‑like pressure.

Tip 2: Incorporate Cone Drills for Direction Changes
Essential Cone Drill Setups
Start with the classic T‑drill: place four cones in a T shape, with one at the top and three at the base forming the crossbar. Sprint forward to the top cone, then shuffle laterally to each side cone, before finishing with a backpedal to the start. This drill builds multi‑directional confidence and sharpens cutting mechanics under load, translating directly to on‑field sport agility patterns.
Next, use the Box Drill: set four cones in a square, sprinting clockwise or counter‑clockwise with 90‑degree turns at each corner. This reinforces consistent, controlled 90‑degree cone change‑of‑direction and improves body control at speed, ideal for basketball, soccer, and other field sports.
For a more reactive setup, scatter cones in a zig‑zag pattern and run zig‑zag sprints with tight, explosive turns. This forces rapid shifts in direction on varied angles, training the hips and feet to respond quickly. Add a lateral shuffle work lane between cones to bias side‑to‑side force production and stability.
Finally, set up a short Mountain Climber Lane with closely spaced cones; sprint from cone to cone while staying low and driving the knees hard. This blends linear speed with short, sharp transitions, priming the nervous system for the kinds of rapid resets seen in shuttle runs, T‑drill variations, and chaotic game situations involving reactive agility cues and deceleration drills.
T-Drill for Multi-Directional Movement
The T‑Drill is a cornerstone of multi‑directional agility work, blending linear sprinting, lateral shuffling, and backward running into a single, punishing pattern. Set four cones in a T shape: one at the starting point (A), one at the top of the T (B), and two at the outer ends of the crossbar (C and D). Start in an athletic stance at cone A, then explosively sprint 10 yards to cone B, staying low and driving the arms.
At cone B, immediately drop into a controlled lateral shuffle, keeping the feet shoulder‑width apart and the hips square. Shuffle to cone C, touch the base, then quickly reverse direction and shuffle to cone D, touching again, before returning to cone B. Finally, backpedal hard to cone A, leaning slightly forward to maintain balance and driving the knees high.
This sequence trains the exact qualities that define on‑field agility: rapid acceleration, decisive deceleration, sharp cutting mechanics, and clean transitions between planes of motion. In terms of sport agility patterns, the T‑Drill mimics the sudden shifts between sprinting forward, reacting laterally, and retreating under load, making it a high‑transfer drill for sports like football, basketball, and soccer. As speed and fatigue climb, maintaining proper posture and footwork through the lateral shuffle work and backpedal becomes the real test of agility, not just how fast the clock reads.
Box Drill Variations for All Skill Levels
The Box Drill (often a 5-10-5 yard square setup) is a staple for agility, but repeating the same pattern can lead to plateaus. Here are several variations to challenge your body and brain in new ways.
1. The Standard Sprint-Shuffle-Backpedal
This is the foundational drill to master before adding complexity.
- Cone 1 to 2: Sprint forward.
- Cone 2 to 3: Lateral shuffle (facing inside the box).
- Cone 3 to 4: Backpedal.
- Cone 4 to 1: Lateral shuffle (facing inside the box).
2. The “Figure 8” Box
Instead of staying on the perimeter, this variation forces tighter cutting angles and internal directional changes.
- Start at Cone 1.
- Sprint diagonally to Cone 3.
- Cut around Cone 3 and shuffle laterally to Cone 4.
- Sprint diagonally to Cone 2.
- Cut around Cone 2 and shuffle laterally back to Cone 1.
3. The Reactionary Box (Partner/Coach Required)
This removes the “planned” element and trains reactive agility (cognitive processing).
- Stand in the center of the box.
- A coach or partner calls out a cone number (1-4) or holds up a colored card corresponding to a cone.
- You must sprint to that cone, touch it, and return to the center as fast as possible, waiting for the next cue.
- Progression: Use visual cues only (pointing) instead of verbal cues to simulate game situations where play is often silent.
4. The “T-Step” Diagonal Cut
Focuses on the transition between linear speed and lateral deceleration.
- Cone 1 to 2: Sprint forward.
- Cone 2: Perform a sharp 45-degree cut toward the center of the box, touching a marker placed in the dead center.
- Center to Cone 3: Backpedal diagonally.
- Cone 3 to 4: Lateral shuffle.
5. Resisted Box Drill (Band Work)
Great for building explosive power and initial acceleration.
- Attach a resistance band to your waist, held by a partner standing outside the box.
- Perform the Standard Box Drill while the partner provides constant tension.
- Note: The partner must move with you to ensure safety and consistent angles of resistance.
6. Multi-Planar Pursuit (The “Chase” Drill)
A competitive variation that mimics game pressure.
- Two athletes start at opposite diagonal corners (e.g., Cone 1 and Cone 3).
- On “Go,” both athletes perform the box drill in the same direction (clockwise or counter-clockwise).
- The goal is to catch the person in front of you or close the gap significantly by the time you complete 2-3 laps.
7. Ball Integration (Sport-Specific)
- Soccer: Dribble a ball through the pattern.
- Basketball: Maintain a dribble (switching hands at each corner) while shuffling and sprinting.
- Football/Rugby: Carry a ball high and tight; have a partner try to strip it at specific corners to train ball security under duress.
Tip 3: Add Plyometric Exercises
Box Jumps for Power
While agility is often associated with foot speed and lateral movement, the engine that powers them is explosive power. You cannot be agile if you cannot generate force quickly against the ground. Box jumps are the quintessential plyometric exercise for developing this vertical power, which directly translates to a faster first step and more explosive cuts.
The Science: Vertical Power = Horizontal Speed
Agility relies on “Triple Extension”—the simultaneous extension of the hips, knees, and ankles. This is the same mechanism used in a box jump. By increasing your ability to explode upward, you increase the force you can put into the ground to propel yourself forward or sideways.
Proper Technique: The “Soft Landing” Philosophy
The goal of a box jump isn’t just to get up; it’s to land effectively.
- The Setup: Stand about 6–12 inches away from the box, feet shoulder-width apart.
- The Load: Swing your arms back while hinging at the hips and bending the knees (athletic stance).
- The Explosion: Swing arms forward forcefully and extend hips, knees, and ankles to propel yourself upward.
- The Landing: Land on top of the box with both feet simultaneously.
- Crucial: Land in the same athletic stance you started in (quarter squat).
- Silent Landing: Try to make as little noise as possible. Noise equals impact; silence equals control.
- The Reset: Step down one foot at a time. Do not jump backward off the box, as this places high stress on the Achilles tendon.
Agility-Specific Box Jump Variations
To maximize the transfer to agility, move beyond the standard jump once you have mastered the basics.
1. Lateral Box Jumps
Agility occurs in multiple planes of motion. This variation builds lateral explosive power essential for side-shuffling and cutting.
- Stand sideways to the box.
- Load your hips and jump laterally (sideways) onto the box.
- Land softly and step down.
- Coach’s Cue: “Push the floor away from the box.”
2. Seated Box Jumps
This eliminates the “stretch-shortening cycle” (the bounce) and forces you to generate power from a dead stop—simulating the initial burst of a sprint or a sudden change of direction.
- Sit on a bench or smaller box (knees at 90 degrees) facing the target box.
- Lift feet slightly off the ground, then slam them down and immediately explode up onto the target box.
3. Single-Leg Box Jumps (Advanced)
Agility is often a single-leg activity (cutting off one foot). This identifies and corrects strength imbalances between your left and right sides.
- Stand on one leg.
- Load the hips and jump onto a lower box, landing on both feet (to buffer the impact) or the same leg (only for elite athletes).
Common Mistakes to Avoid
- “Ego Jumping”: Using a box that is too high forces you to tuck your knees to your chest to clear it. This trains hip flexion (pulling legs up), not hip extension (pushing body up). Use a lower box and focus on how high your hips travel, not how high your feet get.
- Knees Caving In (Valgus): When loading or landing, ensure knees stay in line with the toes. Caving knees are a primary cause of ACL injuries.
Lateral Bounds and Hops
If box jumps are the vertical engine of agility, lateral bounds and hops are the steering wheel. Most sports are rarely played in a straight line; they are won and lost in the frontal plane (side-to-side movement). Lateral bounds and hops train your body to produce and absorb force on a single leg while moving sideways—the exact mechanics required for a defensive shuffle, a tennis sidestep, or a running back finding a hole.
The Distinction: Hops vs. Bounds
It is essential to know the difference to train the right energy system:
- Bound: Taking off from one leg and landing on the opposite leg (Leg A $\rightarrow$ Leg B). This mimics the stride pattern of sprinting or skating.
- Hop: Taking off from one leg and landing on the same leg (Leg A $\rightarrow$ Leg A). This requires higher levels of stability and strength.
1. The Lateral Bound (Skater Jump)
This is the premier drill for developing “push-off” power (abduction).
- The Setup: Stand on your right leg with your left foot hovering off the ground. Drop into a quarter-squat “loaded” position.
- The Drive: Push explosively off your right foot toward the left. Extend your hip, knee, and ankle fully (triple extension).
- The Landing: Land softly on your left foot.1 Absorb the impact by bending the knee and hip immediately upon contact. Your right leg should swing behind you naturally for balance, but try not to let the right foot touch the ground.
- The “Stick”: Hold the landing position for 1–2 seconds to prove you have stability. If you wobble, you aren’t ready to speed it up.
- Progression: Once you can “stick” the landing perfectly, move to Continuous Skater Bounds, rebounding immediately off the ground to train elasticity.
2. Lateral Line Hops (Speed & Stiffness)
While bounds are about distance and power, line hops are about speed and ankle stiffness.
- The Setup: Find a line on the field, court, or gym floor. Stand on one leg.
- The Action: Hop back and forth over the line as quickly as possible.
- The Focus: Do not spend time on the ground. Imagine the floor is hot lava. The movement should come primarily from the ankle, not a deep knee bend.
- Duration: Keep these sets short (e.g., 5–10 seconds) to ensure maximum velocity. If you slow down, the set is over.
3. Heiden Bounds (Power with Reset)
Named after speed skater Eric Heiden, this is a high-intensity variation of the lateral bound.
- Perform a standard lateral bound, but focus purely on maximum distance.
- Reset fully between each rep.
- This is not a conditioning drill; it is a maximum power output drill. Treat it like a heavy single in weightlifting.
Key Technical Cues
- “Nose Over Toes”: When you land, your nose should be vertically aligned over your toes.2 If you are leaning too far back, you are off-balance; too far forward, and you risk falling.
- Watch the Valgus (Knee Collapse): The most critical safety check. When you land on a single leg, your knee must track over your shoelaces. If the knee caves inward toward the midline, you are putting the ACL at risk. Reduce the jump distance until you can keep the knee stable.
- Arm Action: Use your arms to generate momentum.3 Swing them across the body in rhythm with your legs, just like a speed skater.
Depth Jumps for Reactive Strength (Advanced)
If box jumps are about raw power output, Depth Jumps (also known as “Shock Training”) are about Reactive Strength—the ability to switch from absorbing force to producing force in the blink of an eye. This is the “secret weapon” for elite agility because every sharp cut on the field requires you to catch your body weight and immediately redirect it.
The Mechanism: The Stretch-Shortening Cycle (SSC)
Depth jumps overload the “spring” mechanism in your muscles and tendons. When you step off a box, gravity accelerates your body downward. When you hit the ground, your muscles stretch rapidly (eccentric phase).1 If you are strong enough, you can use that elastic energy to “rebound” upward instantly.
- Agility Application: When a wide receiver plants their foot to cut, they are essentially performing a single-leg depth jump. They must absorb the force of their run and explode out at a new angle.
Execution: The “Hot Lava” Mental Cue
- The Setup: Stand on a box (start low: 12–18 inches).2
- The Drop: Step off the box. Do not jump up or down; simply let gravity take you. Imagine you are walking off a ledge.
- The Contact: Land on the balls of your feet with both feet simultaneously.
- The Reaction: The millisecond your feet touch the floor, explode vertically as high as possible.
- The Cue: Minimize time on the ground.3 Treat the floor like it is made of hot lava.
Critical Prerequisites (Safety Warning)
This is an advanced drill with high-impact forces.
- Strength Base: The traditional rule of thumb is that an athlete should be able to Squat 1.5x their body weight before attempting true depth jumps.
- Mechanics: If you cannot land quietly on a standard box jump, you are not ready for depth jumps.
- Volume: Keep reps extremely low. 3 sets of 3–5 reps is sufficient. This taxes the Central Nervous System (CNS) heavily.
Depth Jump vs. Drop Jump
While often used interchangeably, there is a nuance:
- Depth Jump: Focus is on maximum height of the rebound jump. (Great for explosive power).
- Drop Jump: Focus is on minimum ground contact time (spending as little time on the floor as possible). (Great for sprinting speed and quick feet).
For agility, a blend of both is ideal, but prioritizing short ground contact time usually transfers better to rapid directional changes.
Common Mistakes
- The “Squat” Error: Landing deep in a squat before jumping up. This kills the elastic energy and turns the movement into a standard strength exercise. You want a stiff, springy reaction, not a slow muscular push.
- Heel Slamming: Landing flat-footed sends shockwaves through the shins and knees. You must stay on the mid-foot/balls of the feet.
- Box Too High: If the box is too high, your body’s protective mechanisms (Golgi Tendon Organ) kick in, inhibiting contraction to prevent injury. Start lower than you think you need.
Tip 4: Focus on Reaction Time Training
Visual Cue Drills
Partner-Based Reaction Exercises
Technology-Assisted Reaction Training
Tip 5: Build a Progressive Training Schedule
Weekly Workout Structure
Balancing Intensity and Recovery
Tracking Performance Metrics

Warming Up for Agility Work: Priming the Machine
You cannot fire a cannon from a canoe, and you cannot demand explosive speed from a cold, stiff body. Agility training places immense stress on the tendons, ligaments, and the Central Nervous System (CNS). A proper warm-up for agility is distinct from a general fitness warm-up; it must prepare the body for high-velocity eccentric loading (braking) and multi-planar movement.
The Golden Rule: Never perform static stretching (holding a stretch for 30+ seconds) before agility work. Static stretching sedates the nervous system and can temporarily reduce explosive power output. Save that for after the session.
1. Dynamic Stretching Protocols
The goal here is “Mobility in Motion”—taking joints through their full range of motion while increasing core temperature and blood flow.
- Forward Lunge with T-Spine Rotation:
- Why: Opens tight hip flexors (from sitting all day) and mobilizes the thoracic spine.
- How: Step forward into a deep lunge. Place the opposite hand on the floor and rotate the other arm toward the ceiling. Alternate sides.
- Lateral Lunge (Side-to-Side):
- Why: Agility is lateral. You must prepare the adductors (inner thigh) and groin for the extreme lengthening that happens during a cut.
- How: Step wide to the right, keeping the left leg straight. Sit hips back. Shift smoothly to the left.
- Inverted Hamstring Reach (Single-Leg RDL):
- Why: Wakes up the hamstrings and challenges dynamic balance (proprioception).
- How: Stand on one leg. Hinge at the hips, reaching hands toward the floor while extending the free leg back. keep the back flat like a table.
- Gate Openers / Gate Closers:
- Why: Lubricates the hip capsule for rotation.
- How: Lift the knee to the chest and rotate it outward (open). Then lift knee wide and rotate it inward (close).
2. Activation Exercises (Turning the Muscles “On”)
Mobility is useless without stability. Activation exercises target the specific muscles that protect your knees and generate power—specifically the glutes and the core.
- Mini-Band Lateral Walks (Monster Walks):
- The “Pre-Hab” Essential: Place a resistance band around your ankles or just above the knees.
- Action: Assume a quarter-squat athletic stance. Step laterally, maintaining tension on the band.
- Focus: This fires the Glute Medius, the muscle responsible for preventing your knees from caving inward (valgus collapse) during agility cuts.
- Single-Leg Glute Bridges:
- Why: Ensures your glutes are doing the work, not your lower back.
- How: Lie on your back, one knee bent, the other leg in the air. Drive through the heel of the bent leg to lift hips. Pause at the top.
- Pogo Jumps (Ankle Stiffness):
- Why: Prepares the Achilles tendon for impact and “wakes up” the CNS.
- How: Jump strictly using your ankles (knees straight but soft). Bounce quickly like you are skipping rope without the rope. Focus on short ground contact time.
3. The “Ramp Up” (CNS Priming)
Before touching a ladder or cone, you must bridge the gap between warming up and sprinting.
- A-Skips: Rhythmic skipping with high knees and coordinated arm swing.
- Carioca (Grapevine): Fast footwork crossing legs in front and behind to wake up the hips for rotation.
- Short Accelerations: Perform 2–3 reps of 10-yard sprints starting at 50% intensity, then 75%, then 90%.
Proper Form and Technique
Agility is not just about moving fast; it’s about moving efficiently. Without proper mechanics, energy leaks occur, slowing you down and increasing the risk of injury. Mastering these fundamentals ensures that every ounce of force you generate translates into movement.
Body Positioning Fundamentals
Your body posture dictates your ability to react. If you are too upright, you cannot cut; if you are too bent over, you lose balance.
- The Athletic Base: Keep feet shoulder-width apart. This provides a stable platform to push off in any direction. If feet are too narrow, you have no base of support; if too wide, you cannot generate vertical force.
- Low Center of Gravity: “Low man wins.” Bend at the hips and knees, not the back. Think of sitting into a quarter-squat. This lowers your center of mass, making you more stable and allowing for quicker changes of direction.
- Neutral Spine: Keep your chest up and back flat. A rounded back disengages the core and glutes, while an over-arched back stresses the lumbar spine.
- “Nose Over Toes”: When accelerating or decelerating, your lean is critical. During acceleration, a positive shin angle (leaning forward) is key. During deceleration, your center of mass must drop behind your base of support to brake effectively.
Arm Movement Coordination
Legs generate the power, but arms dictate the rhythm and balance. Your arms act as counter-weights and drivers.
- Cheek-to-Cheek: Arm action should be vigorous, with hands swinging from “face cheek to butt cheek.” This ensures a full range of motion.
- Elbow Drive: Lock elbows at approximately 90 degrees. Focus on driving the elbows back, not just swinging the hands forward. The backward drive triggers a stretch reflex in the chest and shoulder, helping propel the opposite leg forward.
- No “Drumming”: Avoid letting arms cross the centerline of the body. Crossing arms causes the torso to rotate unnecessarily, which wastes energy and destabilizes your straight-line path.
- Counter-Balancing: Counterbalancingnts (like shuffles or cuts), arms move differently. They may extend away from the body momentarily to counterbalance a hacounterbalanceessive change of direction, helping you stay upright.
Sport-Specific Agility Applications
Agility is not a one-size-fits-all trait; the spatial demands, rules, and movement patterns of the sport dictate how agility must be trained. A linebacker needs to collide; a tennis player needs to avoid contact. Tailoring drills to these specific needs ensures transferability to the game.
Agility for Basketball Players
Basketball is a game of stopping and starting in confined spaces (the “phone booth”). Agility here is vertical, lateral, and multi-directional.
- The “Closeout” Specialist: Training the ability to sprint from the paint to the three-point line and immediately break down into a choppy-step defensive stance without fouling.
- Defensive Sliding (The Glide): Emphasizing hip mobility to stay low while moving laterally. Drills must focus on preventing the feet from crossing (clicking heels) which causes trips.
- The NBA Lane Agility Drill: A standard metric involving sprinting, defensive shuffling, and backpedaling around the key.
- Focus: Tight turns around the elbows and blocks.
- Transition: Switching instantly from a vertical jump (rebound attempt) to a linear sprint (fast break).
- Screen Navigation: Small-space agility requiring the player to “get skinny” (turning shoulders) to slip through defenders without losing speed.
Soccer and Field Sport Demands
Unlike the court, the field offers vast space, requiring “Curvilinear Speed” (curved running) and the stamina to perform agility bursts over 90 minutes.
- Deceleration from Top Speed: Field athletes reach higher top speeds than court athletes. Drills must focus on the ability to brake safely from a 30-yard sprint, not just a 5-yard burst.
- Curvilinear Agility: Most runs in soccer are not straight lines; they are arcs. Training must involve weaving and bending runs that mimic tracking a ball or an opponent over distance.
- 360-Degree Awareness: The threat can come from behind. Agility drills should involve “checking the shoulder” (scanning) before receiving a pass or turning.
- Ball Integration: Pure foot speed is useless if you leave the ball behind. Advanced drills must overlay agility patterns with dribbling skills (e.g., cone weaving while controlling the ball).
Combat Sports Requirements
In boxing, MMA, and wrestling, agility is played out in inches, not yards. It is about weight distribution, angles, and reaction.
- Micro-Agility & Stance Retention: The ability to move the feet quickly without ever crossing them or losing the “base” needed to punch or sprawl.
- The Pivot and Angle Cut: Using footwork to create dominant angles of attack. Drills focus on pivoting on the lead foot to exit the opponent’s centerline (the “V-step”).
- Level Changes: Agility in the vertical plane—dropping hips instantly for a takedown or a sprawl to defend one. This requires explosive eccentric strength in the quads and glutes.
- Ring/Cage Generalship: Lateral agility used to “cut off the ring,” trapping the opponent in the corner rather than just chasing them in a circle.

Recovery and Injury Prevention
Training breaks you down; recovery builds you up. Agility training involves high impact forces (often 3-5x body weight) and sharp eccentric loading. Without a dedicated recovery protocol, the risk of shin splints, Achilles tendonitis, and ACL tears increases significantly.
Cool-Down Strategies
Stopping abruptly after high-intensity CNS work leaves the body in a sympathetic (fight or flight) state.
- The “Flush” Jog: 3-5 minutes of very low-intensity movement to help pump lactate and metabolic waste products out of the legs.
- Parasympathetic Breathing: Lie on your back with legs elevated (e.g., on a bench). Practice “Box Breathing” (4 seconds in, 4 hold, 4 out, 4 hold) to shift the nervous system from “fight” to “rest and digest.”
- Static Stretching: Now is the time for those long holds. Focus on the hip flexors, calves, and hamstrings to restore muscle length after they have been repeatedly shortened.
Mobility Work for Agility Athletes
Agility requires your joints to hit extreme angles comfortably.
- Ankle Dorsiflexion: If your ankles are stiff, your knees take the impact. Use banded ankle mobilizations to ensure your knee can travel past your toe safely.
- Hip Internal Rotation: The ability to turn the hip inward is crucial for cutting. If you lack this, your lower back often rotates instead, leading to lumbar pain.
- Thoracic Spine (T-Spine) Mobility: Your upper body drives your lower body.—astiff upper back limits your arm drive and ability to rotate into turns.
Recognizing Overtraining Signs
Because agility taxes the Central Nervous System (CNS) more than the muscles, the signs of fatigue are subtle.
- Loss of Coordination: If you start tripping over the ladder or knocking over cones you usually clear, stop. Your CNS is fried.
- Decreased Vertical Jump: A drop in vertical power is the leading indicator of neural fatigue.
- Mood Disturbances: Irritability and lack of motivation are often the first signs that your system is overloaded.
Nutrition for Explosive Performance
You cannot drive a Ferrari on low-grade fuel. Agility is an anaerobic activity, meaning it relies heavily on glycogen (stored carbs) for quick bursts of energy.
Pre-Workout Fuel
The goal is to top off glycogen stores without weighing down the gut.
- Timing: Eat a complex meal 2-3 hours before training. Have a small, easily digestible snack 30-60 minutes prior.
- Carbohydrates are King: Oats, rice, or fruit. These provide the glucose needed for high-intensity muscle contractions.
- Hydration + Electrolytes: Agility drills often cause heavy sweating. Dehydration by just 2% can reduce cognitive function and reaction time—the enemies of agility.
Post-Training Recovery Nutrition
The “Anabolic Window” is about replenishing what was lost to jumpstart repair.
- The 3:1 Ratio: Aim for a ratio of 3 grams of carbohydrates to 1 gram of protein (e.g., chocolate milk or a recovery shake).
- Fast-Acting Protein: Whey isolate or plant-based eqalternativeselp repair mimicrotearsn thscle tissue immediately.
- Replace the Sweat: Weigh yourself before and after training. Drink 16-20oz of water for every pound lost.
Common Agility Training Mistakes
Even with the best drills, poor execution can stall progress or cause injury.
Skipping Warm-Ups
Going from “desk mode” to “sprint mode” is a recipe for a pulled hamstring.
- The “Cold Rubber Band” Analogy: A cold rubber band snaps when stretched; a warm one expands. Your tendons work the same way.
- Ramp-Up Required: A warm-up must include movement preparation (lunges, skips) and neural priming (short bursts of speed) before the main workout.
Overtraining Without Rest
More is not better; better is better.
- Quality > Quantity: 15 minutes of sharp, high-intensity agility work is superior to 60 minutes of sloppy, fatigued movement.
- Rest Intervals: You must rest fully (1:5 work-to-rest ratio) between sets. If you are breathing heavy at the start of the next rep, you are training conditioning, not agility.
Neglecting Proper Footwear
Your connection to the ground is your only source of leverage.
- Surface Matters: Training on turf requires cleats or turf shoes; training on court requires court shoes with lateral support.
- Lateral Containment: Running shoes are designed for forward motion. They often lack the side-wall stability needesidewall your foot in place during a hard cut, leading to rolled ankles.
Equipment Selection Guide
Your training is only as good as your tools. While agility equipment is relatively simple, choosing the wrong gear can lead to frustration (tangled ladders) or injury (slipping on hard plastic). Investing in the right staples ensures your focus remains on the workout, not the setup.
Choosing Quality Ladders
Not all agility ladders are created equal. The difference between a cheap ladder and a professional one often comes down to safety and usability.
- Flat Rungs vs. Round Rungs: This is the most critical safety factor. Always choose flat rungs. Round rungs (often found in older or cheaper models) are a tripping hazard; if you step on one, it can roll, leading to sprained ankles. Flat rungs sit flush with the ground, minimizing trip risks.
- Adjustable Slats: Look for a ladder where the rungs can slide along the side straps. This allows you to customize the box size for different athletes (e.g., smaller boxes for quick feet, larger boxes for bounding) or specific drill requirements.
- Anti-Tangle Straps: The biggest headache with agility ladders is tangling. High-quality ladders often use thicker nylon webbing or come with a specific storage handle/reel that prevents the “spaghetti effect” when you pull it out of the bag.
- Weight and Stability: Flimsy ladders blow away in the wind or shift easily when tapped. Heavier rubber or weighted plastic rungs stay in place better on outdoor turf. If buying lightweight ones, ensure you have ground stakes.
Cone Types and Durability
Cones are the versatile pixels of your training picture. Different shapes serve different purposes.
- Disc Cones (Saucer Cones):
- Best For: General boundary marking and slalom drills.
- The “Crush” Factor: Ensure they are made of soft, low-density polyethylene (LDPE). They should snap back to their original shape immediately after being stepped on. Rigid plastic cones will crack and become sharp hazards.
- Safety: Because they are low to the ground (2 inches), they are the safest option for high-speed deceleration drills where an athlete might accidentally step on one.
- Dome Cones:
- Best For: Stability and obstacle creation.
- Features: These are often weighted and shaped like a half-sphere. They are less likely to be blown away by wind. Many feature a hole on top to hold vertical poles, allowing you to create makeshift hurdles.
- Tall Traffic Cones (9–12 Inches):
- Best For: Visual cues and peripheral vision training.
- Why Use Them: In drills where you want the athlete to keep their “head up” (scanning the field), taller cones are easier to see in the peripheral vision without looking down at the feet.
- Safety Note: These are rigid. Do not use them in close-quarter turning drills where a player might fall onto them.
- Weighted Bases: If you train on artificial turf or gym floors where you cannot use stakes, weighted bases are non-negotiable to prevent equipment from sliding during drills.
Training for Different Fitness Levels
Agility is a skill, not just a physical attribute. Just as you wouldn’t load 300 pounds onto a barbell for a beginner’s first squat, you shouldn’t throw a novice into complex, high-velocity reactive drills. Progressive overload applies to neural programming just as much as it does to muscle building.
Beginner Modifications
For those new to agility training, the goal is Motor Pattern Acquisition. The brain needs to map the movement before the body can perform it quickly.
- Static Mechanics First: Before moving, master the “Athletic Stance” and the “Landing Position.” If a beginner cannot hold a stable single-leg balance for 10 seconds, they aren’t ready to jump on that leg.
- Sub-Maximal Speed (50-70%): Perform drills at half speed. The focus is on precision—hitting the center of the ladder box, keeping the chest up, and not clicking heels.
- Closed Drills (Pre-Planned): All movements should be predictable. The athlete should know exactly where they are going (e.g., “Run to cone A, then cut to cone B”). There is no surprise element yet.
- Visual Reliance is Okay: Beginners need to look at their feet to understand where they are stepping. Allow this initially, but gradually cue them to lift their eyes as they gain confidence.
- Low Impact: Substitute plyometric jumps with “step-ups” or “step-downs” to condition the tendons without the ballistic shock.
Intermediate Progressions
The goal shifts from learning the movement to Force Application and Speed. The training wheels come off.
- Full Velocity: Drills should now be performed at 90-100% intensity. The athlete has earned the right to go fast.
- Eyes Up (Proprioception): The athlete must now execute footwork without looking down. Use visual targets at eye level (e.g., a partner holding up fingers) to force the head up.
- Deceleration Focus: Emphasize the “Stick.” In drills like the Box Drill, the athlete must come to a complete, frozen stop at each cone before accelerating again. This proves they can control their momentum.
- Simple Reaction: Introduce binary cues. For example, a coach points left or right, and the athlete must react. The cognitive load is low (one choice), but it begins to bridge the gap between drill and sport.
Advanced Athlete Protocols
For the elite, the goal is Cognitive Agility and Chaos. The physical movement is second nature; the challenge is processing information under stress.
- Open Drills (Chaotic): The athlete does not know the pattern beforehand. They are responding to a live opponent, a ball, or a complex signal system (e.g., “Red light means backpedal, Green light means sprint”).
- Cognitive Loading: Force the brain to multi-task. Have the athlete catch a tennis ball while performing ladder drills, or solve math problems while navigating a cone maze. This simulates the mental demand of a game where you must dribble, scan the field, and listen to a teammate simultaneously.
- Fatigued State Training: Perform high-level agility drills at the end of a workout to teach the CNS to fire efficiently even when metabolic waste products (lactate) are high—mimicking the 4th quarter or the final round.
- Contact Integration: If safe and sport-appropriate, introduce physical resistance. Use pads or stability balls to bump the athlete mid-cut, forcing them to restabilize their core and maintain their path despite physical interference.
Measuring Your Agility Progress
You cannot improve what you do not measure. While “feeling faster” is a positive sign, objective data is the only way to determine if your training program is actually working. Establishing a baseline and re-testing every 4-6 weeks prevents stagnation and highlights specific weaknesses (e.g., you might be fast linearly but slow laterally).
Baseline Testing Methods
To get accurate data, you need standardized tests that mimic the demands of your sport. Ensure consistency: test on the same surface, at the same time of day, and with the same footwear every time.
1. The 5-10-5 Pro Agility Shuttle (The 20-Yard Shuttle)
This is the gold standard for testing lateral speed and change-of-direction mechanics.
- The Setup: Three cones placed in a straight line, 5 yards apart (Total distance is 10 yards).
- The Execution: Start at the center cone. Sprint 5 yards to the right (touch the line), sprint 10 yards to the far left (touch the line), and sprint 5 yards back through the center finish line.
- What it Measures: Lateral explosive power, body control during braking, and re-acceleration.
2. The T-Test
The T-Test is superior for assessing multi-directional speed because it forces you to sprint, shuffle, and backpedal all in one drill.
- The Setup: Place Cone A at the start. Place Cone B 10 yards forward. Place Cone C 5 yards to the left of B, and Cone D 5 yards to the right of B. (It looks like a capital ‘T’).
- The Execution: Sprint A to B (touch base). Shuffle to C (touch base). Shuffle all the way to D (touch base). Shuffle back to B (touch base). Backpedal to A.
- What it Measures: Forward speed, lateral agility, and the ability to transition into a backpedal without losing balance.
3. The Illinois Agility Test
Amore extendedr duration test that incorporates straight sprints and weaving around obstacles.
- The Setup: A complex grid involving a 10-meter long by 5-meter wide box with four cones down the center for weaving.
- What it Measures: Maneuverability and speed endurance (anaerobic capacity) more than pure explosive power.
Performance Benchmarks
Numbers only mean something if you have context. While elite scores vary by age, gender, and sport, here are general targets for competitive athletes to aim for.
5-10-5 Pro Agility Shuttle Goals:
- Elite (Pro Level): Under 4.0 seconds (Men) / Under 4.4 seconds (Women)
- Competitive (Collegiate/High School): 4.2 – 4.5 seconds (Men) / 4.5 – 4.8 seconds (Women)
- Recreational: Above 4.8 seconds
T-Test Goals:
- Excellent: Under 9.5 seconds (Men) / Under 10.5 seconds (Women)
- Good: 9.5 – 10.5 seconds (Men) / 10.5 – 11.5 seconds (Women)
- Average: Above 11.0 seconds
Note on Improvement: Dropping 0.1 or 0.2 seconds in these tests is a massive improvement. Agility gains come in milliseconds, not seconds.
Creating Your Home Agility Setup
You do not need a gym membership or a private stadium to build elite agility. In fact, some of the best footwork in history was developed in backyards and driveways. The barrier to entry is low, meaning there are no excuses for skipping a session.
Space Requirements: Maximizing Minimal Square Footage
The “Phone Booth” mentality applies here—agility is often about what you can do in a tight space.
- The 10-Yard Rule: For 90% of agility drills (ladders, box drills, plyometrics), a clear area of 10 yards by 5 yards is sufficient.
- Vertical Clearance: If training indoors (garage or basement), ensure you have enough ceiling height for box jumps and plyometrics. You need to be able to reach overhead without hitting the rafters.
- Surface Safety:
- Grass/Dirt: The gold standard. It absorbs impact, sparing your joints. Look for a flat patch in a local park.
- Carpet/Rubber Mats: Good for indoor shock absorption.
- Concrete/Asphalt: Proceed with caution. While good for traction, the lack of shock absorption can lead to shin splints (Medial Tibial Stress Syndrome). If you must train on a driveway, focus on footwork speed rather than high-impact jumps.

Budget-Friendly Equipment Options
You can replicate a professional setup for the price of a coffee.
- The “Chalk Ladder”: If you have a driveway or sidewalk, sidewalk chalk is the ultimate tool. Draw your ladder rungs 18 inches apart. The benefit? It lies perfectly flat, so you never trip or have to untangle it.
- Tape Ladders: For garage floors or basements, use painter’s tape or duct tape to mark out your grid.
- Water Bottle Cones: You don’t need orange plastic discs. Old water bottles, shoes, or even rocks can serve as markers. The key is visibility.
- PVC Pipe Hurdles: Instead of buying expensive mini-hurdles, visit a hardware store. A few lengths of PVC pipe and some elbow joints can create durable hurdles for pennies on the dollar.
- Towel Sliders: If training on a smooth indoor surface (wood or tile), place a towel under your foot to simulate a slide board. This is excellent for training the adductors (groin muscles) and lateral lunges without expensive equipment.
Frequently Asked Questions
How often should I do agility training per week?
- Frequency: Aim for 2–3 sessions per week for optimal results.1
- Recovery: Agility taxes the Central Nervous System (CNS) heavily; allow at least 48 hours between high-intensity sessions.
- Volume: Treat these as “quality” days, not endurance days.
What is the best time of day for agility workouts?
- Ideally, When your body and mind are freshest, typically in the morning or early afternoon.
- Pre-Workout: If combining with strength training, perform agility first while the nervous system is un-fatigued.
- Avoid: Late at night when core temperature drops and neural drive is lower, increasing injury risk.
Can beginners start agility training safely?
- Yes: But start with “closed” drills (predictable patterns) before moving to reactive drills.
- Modifications: Reduce speed to 50% to master mechanics first.
- Focus: Prioritize landing mechanics (absorption) over jump height or speed.
How long does it take to see agility improvements?
- Neural Adaptation: You may “feel” faster and smoother within 2–4 weeks as the brain learns to fire muscles more efficiently.
- Physiological Changes: Significant structural changes (tendon stiffness, muscle power) typically take 8–12 weeks of consistent training.
Do I need special shoes for agility training?
- Crucial: Yes. Avoid standard running shoes, which have high stack heights and mesh uppers that offer no lateral support.
- Recommendation: Wear cross-training shoes, court shoes (basketball/tennis), or cleats (for turf) that provide a low profile and sidewall stabilitsidewallvent ankle rolls.
Can agility training help with weight loss?
- HIIT Effect: Agility drills often mimic High-Intensity Interval Training, which burns significant calories in a short time.2
- EPOC: The explosive nature creates “Excess Post-Exercise Oxygen Consumption,” keeping your metabolism elevated for hours after the workout.
At what age should kids start agility training?
- Early Development: Basic coordination games (tag, hopscotch) can start as young as 6–8 years old.
- Formal Training: Structured drills should wait until slightly later (10-12+), and should always prioritize fun and general movement literacy over rigid specialized drills.
Is agility training only for athletes?
- Real-World Application: No. Agility is functional for everyone—it helps in navigating crowded streets, recovering from a trip or slip, and playing with children.3
- Lifelong Skill: Maintaining agility preserves independence and mobility as you age.4
How do I prevent injuries during agility drills?
- The Big Three: 1) Thorough dynamic warm-up. 2) Correct footwear and surface (avoid concrete). 3) Stopping immediately when form breaks down due to fatigue.
- Technique: Never sacrifice safe knee alignment for a faster rep.
Can I do agility training at home without equipment?
- Absolutely: Use “line drills” (hopping over a floor crack), imaginary hurdles, or shadow boxing footwork.
- DIY: Use water bottles as cones or sidewalk chalk to draw ladders.5
Should I do agility training before or after strength workouts?
- Always Before: Agility requires maximum neural output. If you lift heavy first, your muscles will be too fatigued to move with the necessary speed and precision, reinforcing bad habits.
- Exception: If using agility purely for conditioning (metabolic finish), it can be done after, but risk of injury is higher.
How does agility training improve sports performance?
- Efficiency: It teaches you to move with less wasted energy.6
- Separation: In team sports, the ability to change direction 0.1 seconds faster than your opponent creates the space needed to score or defend.
What muscles does agility training work?
- Primary Drivers: Calves, hamstrings, glutes, and quadriceps.
- Stabilizers: Heavily engages the core (obliques/abdominals) for balance and the hip abductors/adductors for lateral movement.
- Fiber Type: It specifically targets Type II (Fast-Twitch) muscle fibers.
Can agility training improve balance for older adults?
- Fall Prevention: Yes. It trains “proprioception” (body awareness) and the ability to recover equilibrium after a sudden shift in weight, which is critical for preventing falls.
- Modifications: Use slower tempos and low-impact movements (no jumping).
How long should each agility training session last?
- Short & Sharp: Excluding warm-up, the actual work should be 15–30 minutes max.7
- The Rule: Stop as soon as you slow down. Agility is about peak speed; once you are tired, you are training endurance, not agility.
Conclusion
Recap of the 5 Pillars of Explosive Agility
- Foundation: Building the strength to absorb force before creating it.
- Deceleration: Mastering the brakes so you can change direction instantly.
- Reaction: Training the brain to process chaos, not just feet to follow a pattern.
- Tools: Using ladders, cones, and plyometrics with specific intent.
- Recovery: Respecting the nervous system’s need for rest to prevent burnout.8
Consistency is King: The Long Game Approach
- Progress over Perfection: Agility is a perishable skill. Small, consistent doses of training yield better results than sporadic “hero” sessions.
- Patience: Trust the process. The neural connections take time to solidify, but once they do, the speed is permanent.
Final Call to Action: Start Your First Drill Today
- Get Moving: You don’t need a perfect plan to start. Clear a 10-foot space, perform the 5-10-5 shuttle test to set your baseline, and commit to becoming a more dynamic, explosive version of yourself.
- Engagement: Pick one drill from this guide and add it to your warm-up tomorrow.